Subterranean Termite Treatment Review
 |
|
Techletter can get your pest control training up and running. |
Consider purchasing Techletter sets from previous years.
|
photo © iStockphoto/
Chahine Shields |
|
|
Written in plain English, with easy-to-follow safety instructions. More than 50 safety topics included. |
|
Improve the Effectiveness of Your Termiticide Soil Application
Here are some tips for ensuring good coverage during application of a liquid termiticide to the soil and to the critical areas under and around a structure:
-
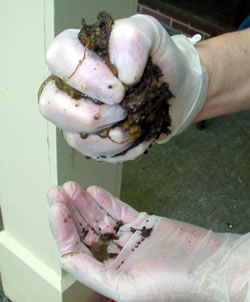 |
| If water runs out of soil when you squeeze it, the soil is saturated and unsuitable for treatment. |
| Photo © Pinto & Associates, Inc. |
-
Check for saturated soil
- Saturated soil cannot absorb any more liquid, including the liquid that makes up your termiticide emulsion. The termiticide simply pools or runs downhill to nontarget sites. That's why termiticide labels prohibit application to soil that is saturated or frozen. Pick up a handful of soil from 6 inches below the surface and squeeze it. If it is saturated, water will run out. If you see standing water, the soil is saturated. In either case, wait for another day to treat.
-
Check the soil type
- Termiticide flows differently depending on whether the soil is sandy, hard clay, or rich loam. Clay soil means very slow termiticide flow. You will need to use lower pressure than normal, and may need to increase the termiticide concentration and reduce the volume if the label permits. When rodding in heavy clay soils, rod holes should be spaced 3 to 4 inches apart. In lighter and sandy soils, rod holes can be spaced 6 to 8 inches apart.
-
Calibrate often
- Even if you use a flow meter, periodically measure your output into a bucket to be sure that you really do apply 1 gallon of termiticide when the meter says you do. If you use the counting method, remember that you will have to calibrate to determine a separate number of "seconds per gallon" for each application tool you use, and for each pressure you use.
-
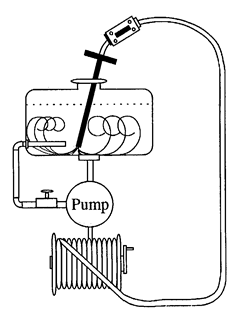 |
| Don't just depend on the rig's bypass agitation to fully mix the termiticide |
| Graphic © Pinto & Associates |
-
Mix the termiticide well
- If you fail to mix the termiticide adequately in the tank, layers of different concentrations can form. Then, as you treat, some areas get less than an effective dose, others more, leaving breaks in the chemical barrier. Follow the manufacturer's instructions. At a minimum, do the following: fill the tank 1/4 to 1/3 full, start bypass agitation, place treating tool in tank, add termiticide and remaining water, and let it circulate for 2-3 minutes.
-
Keep your pressure low
- Soil can only soak up so much termiticide; any more and it simply pools, or worse, runs downhill. Whether rodding or injecting, don't pump termiticide faster than the soil can absorb it. Dry soil accepts termiticide faster than moist soil, sand faster than clay, and loose-packed soil faster than hard-packed soil.
-
Use the best tip for the job
- During subslab injection, for example, a lateral dispersion tip aimed towards the foundation gives better distribution where it counts. And under a dirt-filled porch, a 360° tip gives the best distribution. Consider long rodding underneath the slab for those structures with large settlement voids or sand fill.
-
-
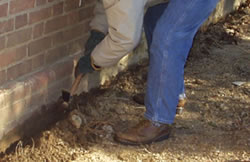 |
| Dig the trench so that it is slanted slightly towards the wall. |
| Photo © Pinto & Associates, Inc. |
-
Always trench when rodding along the foundation perimeter
- A typical trench should be about 6 inches wide, and 8 to 10 inches deep, although special conditions may require a deeper trench. Trenching guarantees you a section of soil where the barrier is continuous, while rodding may leave gaps. Dig the trench slightly slanted towards the wall so that the emulsion seeps into the soil against the foundation rather than away from it. A combination of trenching and rodding gives better termiticide distribution than either method alone.
-
Break up any clods in the trench
- The termiticide mixture may not penetrate into hardened clods of dirt, leaving distinct areas of untreated soil. Step on or otherwise break up any large clods of soil before flooding the trench.
-
 |
| Build dams and adjust treatment rates for a house on hill or you will get poor coverage. |
| Graphic © Pinto & Associates, Inc. |
-
Build dams when trenches aren't level
- To prevent the termiticide mixture from simply running downhill to the lowest points of the trench, build simple dirt dams every few feet. They hold the liquid in place until it seeps down into the soil.
-
Adjust treatment rates for a house on a hill
- The distance down to the footer will vary along the foundation wall when a house was built on a hill. Remember to adjust the volume. Break the wall into ten-foot sections in your mind and calculate the average rate for each section, and then give it a little extra at the deep end, a little less at the shallow end.
-
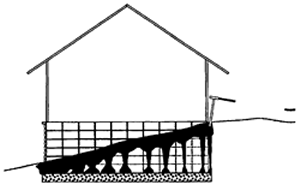
Be thorough when treating dirt-filled porches
- Raised, dirt-filled porches and stoops are at high risk for subterranean termite attack. They are inaccessible, damp, and often filled with wood debris left during construction. Be sure to get the termiticide next to the foundation wall and all the way down to the footing. Don't apply it with a sub-slab injector. Instead, rod down to the top of the footing. You can use a standard soil rod or a slab "needle." If the rod won't go down to the foundation, you've likely run into a chunk of cinderblock, concrete, or wood. Use a solid rod to hammer through the obstacle. As you apply the termiticide, visualize yourself completely coating the soil from the foundation wall, out 6-inches, and from the footing to the soil surface. Some technicians rod at an angle or "cross rod" in an X-pattern for better coverage, or horizontal rod from the side. Also consider applying termiticide as a supplemental treatment to get the termiticide onto any debris, form boards, or wooden porch structure.
-
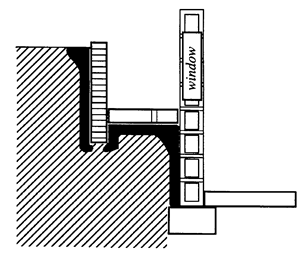 |
| For window wells made of brick or block, trench and rod around the outside and rod around the inside of the entire well. |
| Graphic © Pinto & Associates |
-
Know how to treat window wells
- For window wells with concrete floors, drill the slab and inject termiticide so that it protects the foundation wall. You may need to rod the holes to get the chemical down the foundation's face. For wells with gravel floors, rod down into the soil, keeping the holes close together. You may be able to pull back the gravel and trench and rod. For window wells made of brick or block, trench and rod around the outside and rod around the inside of the entire well.
-
Look out for foam insulation
- Termites can bypass termiticide in the soil by tunneling through the foam panels. Since foam insulation is waterproof, termiticide will not penetrate. If you discover foam panels while trenching or drilling, call your office for guidance before continuing treatment.
-
If you treat inside block walls, inject the blocks close to footing
- Research has shown that (1) block void treatment does not effectively coat the inside of the blocks with termiticide and (2) termiticide will not reach the footing if the application is made more than three blocks above it. Treat block walls low and close to the footing, and be sure to drill and treat every void. Test drill in the center of the first block to see if you're dealing with "two-hole" or "three-hole" blocks.